- Cloud Security Lab a Week (S.L.A.W)
- Posts
- Build a VPC with IaC and Maybe TLC
Build a VPC with IaC and Maybe TLC
Since we deleted our VPC last week, let's recreate it but this time using CloudFormation.
Rich Mogull
August 01, 2024 • Estimated Reading Time: 12 minutes
Prerequisites
Have a workload account where you can build the VPC.
The Lesson
In our last couple labs we built a VPC with two public and two private subnets using the console. Then we… deleted it, wiping out all our hard work. Why? Because those pesky NAT Gateway charges add up quickly.
This week I won’t introduce any new big concepts. Instead we will reinforce our learning by building out the exact same VPC using CloudFormation. And I’ll provide the entire template so this is an opportunity to read through each piece, learn how a VPC is wired, and learn some Infrastructure as Code (IaC) in the process.
This is important because, as I mentioned before, one of the best ways to manage costs in training environments is to create and destroy our infrastructure on demand so it isn’t sitting there, idly drawing on our credit card like a freeloading child. Seriously kids, do you really need to eat that much?!?
YAML vs. JSON
There are a variety of IaC ‘languages’ out there, but they mostly use some form of JSON or YAML (or YML) for their syntax. The most popular for AWS are Amazon’s CloudFormation and Hashicorp’s Terraform. As mentioned, we use CloudFormation (for now) because it’s built into AWS. To use Terraform we would need to run it from our computer or some other execution environment. There are also overlay options where you write your IaC in a programming language and behind the scenes it translates back to the foundational IaC (like AWS CDK).
JSON stands for JavaScript Object Notation, and YAML for Yet Another Markdown Language. Based on sense of humor, at least, YAML wins. Also YAML is a superset of JSON, so YAML parsers can understand JSON embedded in YAML documents.
Although we use JSON for all our policies, I prefer YAML for IaC. Here are two equivalent statements (first JSON, then YAML):
    "CloudSLAWInternetGateway": {
      "Type": "AWS::EC2::InternetGateway",
      "Properties": {
        "Tags": [
          {
            "Key": "Name",
            "Value": "CloudSLAW-IGW"
          }
        ]
      }
    },
# Internet Gateway
CloudSLAWInternetGateway:
Type: 'AWS::EC2::InternetGateway'
Properties:
Tags:
- Key: Name
Value: CloudSLAW-IGW Our VPC Piece by Piece
Instead of boring you with more background, let’s jump in and walk through each major piece of the template we’ll build in the lab. This will help you understand VPC basics, as you see all the relationships and required elements.
AWSTemplateFormatVersion: '2010-09-09'
Description: CloudSLAW CloudFormation template to create a VPC with public and private subnets, and a NAT gatewayThe template format version is a standard required element for all templates. The Description is optional but always recommended.
Resources:
# VPC
CloudSLAWVPC:
Type: 'AWS::EC2::VPC'
Properties:
CidrBlock: '10.0.0.0/16'
EnableDnsSupport: 'true'
EnableDnsHostnames: 'true'
Tags:
- Key: Name
Value: CloudSLAWResources tells CloudFormation that it’s time to get to work! It’s the list of things to be built. In more complex templates we might take in external parameters or set some variables or something.
Anything with a # is a comment, like in most programming languages. That one is just so we know what we are building. Then CloudSLAWVPC is the unique name we can reference from other places. Then we hit two big sections:
Type is “this is what I want you to build”. In this case it’s a VPC. These are all defined in the documentation.
Properties are resource-specific settings, which also come from the documentation.
In this case you see we define the CIDR block like we did in the console. Then we turn on DNS support and hostnames. The console did this for us automatically, but with IaC we must define everything ourselves.
You should also notice that we include a tag for the name. Most names in AWS are just tags, and the console knows how to display them. Okay, we have our VPC… now we need some core components to make it work:
  # Internet Gateway
  CloudSLAWInternetGateway:
    Type: 'AWS::EC2::InternetGateway'
    Properties:
      Tags:
        - Key: Name
Value: CloudSLAW-IGWPretty basic. We don’t need to worry about assigning anything. Technically we don’t even need a name. Must a VPC have an Internet Gateway? Not necessarily — you can build a fully private VPC without Internet access. In our case we need it to handle our public subnets and for our NAT Gateway.
CloudSLAWAttachGateway:
Type: 'AWS::EC2::VPCGatewayAttachment'
Properties:
VpcId: !Ref CloudSLAWVPC
InternetGatewayId: !Ref CloudSLAWInternetGatewayDid I fail to mention you actually need to attach the gateway? Take a look at its definition and notice that it doesn’t specify the VPC. It’s just an Internet Gateway, floating in the ether. We need to create a gateway attachment to link it to the VPC.
Oh, and notice that !Ref? Like, what’s that all about? This is a core capability of any IaC. The magic of IaC is that we define what we want built, and the IaC does the building for us. Think about making that attachment — as you’ve seen when making other things in AWS, when you create something it gets a unique ID. When we build things that use other things we need those IDs. As in “Attach the gateway with igw-123 to VPC-456”. But we can’t do that in our template if we don’t know the IDs. Those references allow us to refer to other parts of our template, and the IaC platform uses them to decide what order to build in and to understand dependencies and links.
# DHCP Options Set
CloudSLAWDHCPOptionSet:
Type: 'AWS::EC2::DHCPOptions'
Properties:
DomainName: 'ec2.internal'
DomainNameServers:
- 'AmazonProvidedDNS'
Tags:
- Key: Name
Value: CloudSLAW-DHCP
CloudSLAWVPCDHCPOptionsAssociation:
Type: 'AWS::EC2::VPCDHCPOptionsAssociation'
Properties:
DhcpOptionsId: !Ref CloudSLAWDHCPOptionSet
VpcId: !Ref CloudSLAWVPCI mentioned it in our other labs, but a DHCP Option Set is a required component of a VPC, which manages some common networking elements which other systems expect to have available. It defines internal domain names, and can also define additional options such as which DNS or Network Time Protocol (NTP) servers to use. We keep ours to the basics, and the undefined options just fall back to Amazon’s defaults.
There are other core components we need for a functional VPC, like route tables, but we need subnets before we get there.
# Subnets
SlawPublicSubnet1:
Type: 'AWS::EC2::Subnet'
Properties:
VpcId: !Ref CloudSLAWVPC
CidrBlock: '10.0.1.0/24'
AvailabilityZone: !Select [ 0, !GetAZs '' ]
MapPublicIpOnLaunch: 'true'
Tags:
- Key: Name
Value: slaw-public-1
SlawPublicSubnet2:
Type: 'AWS::EC2::Subnet'
Properties:
VpcId: !Ref CloudSLAWVPC
CidrBlock: '10.0.2.0/24'
AvailabilityZone: !Select [ 1, !GetAZs '' ]
MapPublicIpOnLaunch: 'true'
Tags:
- Key: Name
Value: slaw-public-2Look familiar? It’s exactly what we built last week. The name and type are pretty obvious, but there’s some new weirdness in the properties in Availability Zones?
If you recall, an AZ is basically a separate datacenter for resiliency, and when we create subnets we assign them to an AZ. !GatAZs is a built-in function of CloudFomation which says “gimme a list of the current AZs”. !Select [0 means “gimme the first thing in the list”. Since we want our subnets in different AZs, we also select the next one from the list for public subnet #2.
MapPublicIPOnLaunch means we assign an AWS controlled Internet-accessible IP by default to anything launched in that subnet. You can totally turn this off, and probably want to in most production environments.
Okay, that’s our two public subnets — anything different for the privates?
SlawPrivateSubnet1:
Type: 'AWS::EC2::Subnet'
Properties:
VpcId: !Ref CloudSLAWVPC
CidrBlock: '10.0.3.0/24'
AvailabilityZone: !Select [ 0, !GetAZs '' ]
Tags:
- Key: Name
Value: slaw-private-1
SlawPrivateSubnet2:
Type: 'AWS::EC2::Subnet'
Properties:
VpcId: !Ref CloudSLAWVPC
CidrBlock: '10.0.4.0/24'
AvailabilityZone: !Select [ 1, !GetAZs '' ]
Tags:
- Key: Name
Value: slaw-private-2No real difference yet, except we skip the MapPublicIP thing, which isn’t required. Notice we stick with the same two AZs. This is important for when we start mapping things like load balancers, where we need the public and private sides to share the same Availability Zones.
# Route Tables
PublicRouteTable:
Type: 'AWS::EC2::RouteTable'
Properties:
VpcId: !Ref CloudSLAWVPC
Tags:
- Key: Name
Value: CloudSLAW-Public-RT
PrivateRouteTable:
Type: 'AWS::EC2::RouteTable'
Properties:
VpcId: !Ref CloudSLAWVPC
Tags:
- Key: Name
Value: CloudSLAW-Private-RTNow we get to route tables. Like what we built in the console, we have two — one for the public subnet and one for the private. But aside from the names, notice something missing? We haven’t attached them to the subnets — they just exist in the VPC.
# Subnet Route Table Associations
PublicSubnet1RouteTableAssociation:
Type: 'AWS::EC2::SubnetRouteTableAssociation'
Properties:
SubnetId: !Ref SlawPublicSubnet1
RouteTableId: !Ref PublicRouteTable
PublicSubnet2RouteTableAssociation:
Type: 'AWS::EC2::SubnetRouteTableAssociation'
Properties:
SubnetId: !Ref SlawPublicSubnet2
RouteTableId: !Ref PublicRouteTable
PrivateSubnet1RouteTableAssociation:
Type: 'AWS::EC2::SubnetRouteTableAssociation'
Properties:
SubnetId: !Ref SlawPrivateSubnet1
RouteTableId: !Ref PrivateRouteTable
PrivateSubnet2RouteTableAssociation:
Type: 'AWS::EC2::SubnetRouteTableAssociation'
Properties:
SubnetId: !Ref SlawPrivateSubnet2
RouteTableId: !Ref PrivateRouteTableCool, that was keeping me up at night. Okay, our route tables are wired into our subnets. But… they don’t route any traffic yet. Let’s fix that.
PublicRoute:
Type: 'AWS::EC2::Route'
DependsOn: CloudSLAWAttachGateway
Properties:
RouteTableId: !Ref PublicRouteTable
DestinationCidrBlock: '0.0.0.0/0'
GatewayId: !Ref CloudSLAWInternetGatewayThat’s a route. The first !Ref tag assigns it to the public route table. Then we define our destination (what the resource is trying to reach) which in this case, is 0.0.0.0/0 (the Internet). Then the second !Ref says to send any traffic to 0.0.0.0/0 to the Internet Gateway, exactly like last week.
But what about our private subnets? First we need a NAT Gateway.
# NAT Gateway
CloudSLAWElasticIP:
Type: 'AWS::EC2::EIP'
Properties:
Domain: vpc
CloudSLAWNATGateway:
Type: 'AWS::EC2::NatGateway'
Properties:
AllocationId: !GetAtt CloudSLAWElasticIP.AllocationId
SubnetId: !Ref SlawPublicSubnet1
Tags:
- Key: Name
Value: CloudSLAW-NATOkay, the point here is notice that we first ask for an Elastic IP address. This is a static Internet IP address we rent from AWS. NAT Gateways need their own public IP address, and AWS makes us pay for one instead of just assigning it.
This little block first requests the IP. Then it requests a NAT Gateway with an “allocation” of that IP, and puts it on one of our public subnets (again, we did all this in the console last week). A NAT Gateway need three things: a public IP, a public subnet to sit in (since it uses the Internet Gateway), and the NAT Gateway itself.
With that set up, let’s build our private subnet routes.
PrivateRoute:
Type: 'AWS::EC2::Route'
Properties:
RouteTableId: !Ref PrivateRouteTable
DestinationCidrBlock: '0.0.0.0/0'
NatGatewayId: !Ref CloudSLAWNATGatewayPretty simple. Route anything asking for the Internet to the NAT Gateway.
“Now wait a darn minute!” you are asking yourself, “what about the local route we saw last week?” That route looked like 10.0.0.0/16 local. AWS just adds that by default to all route tables — we don’t need to explicitly set it up.
At this point we have our core VPC, our Internet Gateway, our NAT Gateway, and our subnets and route tables. What’s missing? My least favorite required VPC component: the venerable Network Access Control List (NACL). A NACL controls what traffic can go where, but it’s not stateful, which is a topic for another day. I very very rarely use them, but those of you in enterprises and pushing old-school firewalls around are more likely to encounter them. I don’t want to talk about them yet, but we need them, so let’s plop ‘em down at the end.
# Default NACL Entries
InboundPublicNetworkAclEntry:
Type: 'AWS::EC2::NetworkAclEntry'
Properties:
NetworkAclId: !Ref PublicNetworkAcl
RuleNumber: 100
Protocol: -1
RuleAction: allow
Egress: false
CidrBlock: '0.0.0.0/0'
OutboundPublicNetworkAclEntry:
Type: 'AWS::EC2::NetworkAclEntry'
Properties:
NetworkAclId: !Ref PublicNetworkAcl
RuleNumber: 100
Protocol: -1
RuleAction: allow
Egress: true
CidrBlock: '0.0.0.0/0'
InboundPrivateNetworkAclEntry:
Type: 'AWS::EC2::NetworkAclEntry'
Properties:
NetworkAclId: !Ref PrivateNetworkAcl
RuleNumber: 100
Protocol: -1
RuleAction: allow
Egress: false
CidrBlock: '0.0.0.0/0'
OutboundPrivateNetworkAclEntry:
Type: 'AWS::EC2::NetworkAclEntry'
Properties:
NetworkAclId: !Ref PrivateNetworkAcl
RuleNumber: 100
Protocol: -1
RuleAction: allow
Egress: true
CidrBlock: '0.0.0.0/0'
# Associate Network ACLs with Subnets
PublicSubnet1NetworkAclAssociation:
Type: 'AWS::EC2::SubnetNetworkAclAssociation'
Properties:
SubnetId: !Ref SlawPublicSubnet1
NetworkAclId: !Ref PublicNetworkAcl
PublicSubnet2NetworkAclAssociation:
Type: 'AWS::EC2::SubnetNetworkAclAssociation'
Properties:
SubnetId: !Ref SlawPublicSubnet2
NetworkAclId: !Ref PublicNetworkAcl
PrivateSubnet1NetworkAclAssociation:
Type: 'AWS::EC2::SubnetNetworkAclAssociation'
Properties:
SubnetId: !Ref SlawPrivateSubnet1
NetworkAclId: !Ref PrivateNetworkAcl
PrivateSubnet2NetworkAclAssociation:
Type: 'AWS::EC2::SubnetNetworkAclAssociation'
Properties:
SubnetId: !Ref SlawPrivateSubnet2
NetworkAclId: !Ref PrivateNetworkAclThat’s our entire template to build out the exact same VPC we built by hand in the last lab. For our hands-on lab this week we’ll deploy it, and I’m giving you two different options on how to build it.
One quick side note: Creating a VPC also creates a default route table. We didn’t specify it, and when you look in the console later you’ll see it isn’t even attached to anything, since we created our own by hand.
Lesson Key Points
Infrastructure as Code enables us to define what we want built, and IaC tools use the template to build out the defined infrastructure.
IaC is usually a version of JSON or YAML. Pick your favorite.
When defining a resource it will have various properties, some required and some optional. This will be in the documentation.
!Ref is how we tell CloudFormation to pull the ID of something it already built.
IaC typically doesn’t need things to be in the right order — the tool figures out the best order to create things for you — but correct sequencing makes things much easier to read.
Most IaC tools include fancy functions for things, like getting a list of Availability Zones, which would be hard or impossible otherwise.
We covered the minimum requirements for building a VPC with 2 public and 2 private subnets with a NAT Gateway. This is one structure for a network, but far from the only way.
The Lab
Today’s lab is a choose your own adventure!
You can copy and paste the IaC elements from this blog post, and build your final template piece by piece.
You can just paste the entire thing in all at once. It isn’t like I’m in your home to stop you. Or am I?!?!?!
We have two educational goals:
Learn the required components and connections to create a VPC.
Learn the fundamentals of CloudFormation so we can read them, not just copy and paste.
Let’s roll!
Video Walkthrough
Step-by-Step
Sign in and go to TestAccount1 > AdministratorAccess:

Make sure you are in Oregon, and then go to CloudFormation > Create stack:

You may recall that previously when we used CloudFormation, I provided the URL of a template stored in Amazon S3, and you pasted that URL in. Today we’ll build our template in a builder, so you can visualize everything as we go. Here you have a choice. If you are short on time (or lazy) you can copy the entire template at once and use that. Here it is:
AWSTemplateFormatVersion: '2010-09-09'
Description: CloudSLAW CloudFormation template to create a VPC with public and private subnets, and a NAT gateway
Resources:
  # VPC
  CloudSLAWVPC:
    Type: 'AWS::EC2::VPC'
    Properties:
      CidrBlock: '10.0.0.0/16'
      EnableDnsSupport: 'true'
      EnableDnsHostnames: 'true'
      Tags:
        - Key: Name
          Value: CloudSLAW
  # Internet Gateway
  CloudSLAWInternetGateway:
    Type: 'AWS::EC2::InternetGateway'
    Properties:
      Tags:
        - Key: Name
          Value: CloudSLAW-IGW
  CloudSLAWAttachGateway:
    Type: 'AWS::EC2::VPCGatewayAttachment'
    Properties:
      VpcId: !Ref CloudSLAWVPC
      InternetGatewayId: !Ref CloudSLAWInternetGateway
  # DHCP Options Set
  CloudSLAWDHCPOptionSet:
    Type: 'AWS::EC2::DHCPOptions'
    Properties:
      DomainName: 'ec2.internal'
      DomainNameServers:
        - 'AmazonProvidedDNS'
      Tags:
        - Key: Name
          Value: CloudSLAW-DHCP

  CloudSLAWVPCDHCPOptionsAssociation:
    Type: 'AWS::EC2::VPCDHCPOptionsAssociation'
    Properties:
      DhcpOptionsId: !Ref CloudSLAWDHCPOptionSet
      VpcId: !Ref CloudSLAWVPC
# Subnets
  SlawPublicSubnet1:
    Type: 'AWS::EC2::Subnet'
    Properties:
      VpcId: !Ref CloudSLAWVPC
      CidrBlock: '10.0.1.0/24'
      AvailabilityZone: !Select [ 0, !GetAZs '' ]
      MapPublicIpOnLaunch: 'true'
      Tags:
        - Key: Name
          Value: slaw-public-1

  SlawPublicSubnet2:
    Type: 'AWS::EC2::Subnet'
    Properties:
      VpcId: !Ref CloudSLAWVPC
      CidrBlock: '10.0.2.0/24'
      AvailabilityZone: !Select [ 1, !GetAZs '' ]
      MapPublicIpOnLaunch: 'true'
      Tags:
        - Key: Name
          Value: slaw-public-2
  SlawPrivateSubnet1:
    Type: 'AWS::EC2::Subnet'
    Properties:
      VpcId: !Ref CloudSLAWVPC
      CidrBlock: '10.0.3.0/24'
      AvailabilityZone: !Select [ 0, !GetAZs '' ]
      Tags:
        - Key: Name
          Value: slaw-private-1

  SlawPrivateSubnet2:
    Type: 'AWS::EC2::Subnet'
    Properties:
      VpcId: !Ref CloudSLAWVPC
      CidrBlock: '10.0.4.0/24'
      AvailabilityZone: !Select [ 1, !GetAZs '' ]
      Tags:
        - Key: Name
          Value: slaw-private-2
# Route Tables
  PublicRouteTable:
    Type: 'AWS::EC2::RouteTable'
    Properties:
      VpcId: !Ref CloudSLAWVPC
      Tags:
        - Key: Name
          Value: CloudSLAW-Public-RT

  PrivateRouteTable:
    Type: 'AWS::EC2::RouteTable'
    Properties:
      VpcId: !Ref CloudSLAWVPC
      Tags:
        - Key: Name
          Value: CloudSLAW-Private-RT
# Routes
PublicRoute:
Type: 'AWS::EC2::Route'
DependsOn: CloudSLAWAttachGateway
Properties:
RouteTableId: !Ref PublicRouteTable
DestinationCidrBlock: '0.0.0.0/0'
GatewayId: !Ref CloudSLAWInternetGateway
# Subnet Route Table Associations
  PublicSubnet1RouteTableAssociation:
    Type: 'AWS::EC2::SubnetRouteTableAssociation'
    Properties:
      SubnetId: !Ref SlawPublicSubnet1
      RouteTableId: !Ref PublicRouteTable

  PublicSubnet2RouteTableAssociation:
    Type: 'AWS::EC2::SubnetRouteTableAssociation'
    Properties:
      SubnetId: !Ref SlawPublicSubnet2
      RouteTableId: !Ref PublicRouteTable

  PrivateSubnet1RouteTableAssociation:
    Type: 'AWS::EC2::SubnetRouteTableAssociation'
    Properties:
      SubnetId: !Ref SlawPrivateSubnet1
      RouteTableId: !Ref PrivateRouteTable

  PrivateSubnet2RouteTableAssociation:
    Type: 'AWS::EC2::SubnetRouteTableAssociation'
    Properties:
      SubnetId: !Ref SlawPrivateSubnet2
      RouteTableId: !Ref PrivateRouteTable
 # NAT Gateway
  CloudSLAWElasticIP:
    Type: 'AWS::EC2::EIP'
    Properties:
      Domain: vpc

  CloudSLAWNATGateway:
    Type: 'AWS::EC2::NatGateway'
    Properties:
      AllocationId: !GetAtt CloudSLAWElasticIP.AllocationId
      SubnetId: !Ref SlawPublicSubnet1
      Tags:
        - Key: Name
          Value: CloudSLAW-NAT
 PrivateRoute:
    Type: 'AWS::EC2::Route'
    Properties:
      RouteTableId: !Ref PrivateRouteTable
      DestinationCidrBlock: '0.0.0.0/0'
      NatGatewayId: !Ref CloudSLAWNATGateway
# Network ACLs
PublicNetworkAcl:
Type: 'AWS::EC2::NetworkAcl'
Properties:
VpcId: !Ref CloudSLAWVPC
Tags:
- Key: Name
Value: CloudSLAW-Public-NACL
PrivateNetworkAcl:
Type: 'AWS::EC2::NetworkAcl'
Properties:
VpcId: !Ref CloudSLAWVPC
Tags:
- Key: Name
Value: CloudSLAW-Private-NACL
 # Default NACL Entries
  InboundPublicNetworkAclEntry:
    Type: 'AWS::EC2::NetworkAclEntry'
    Properties:
      NetworkAclId: !Ref PublicNetworkAcl
      RuleNumber: 100
      Protocol: -1
      RuleAction: allow
      Egress: false
      CidrBlock: '0.0.0.0/0'

  OutboundPublicNetworkAclEntry:
    Type: 'AWS::EC2::NetworkAclEntry'
    Properties:
      NetworkAclId: !Ref PublicNetworkAcl
      RuleNumber: 100
      Protocol: -1
      RuleAction: allow
      Egress: true
      CidrBlock: '0.0.0.0/0'

  InboundPrivateNetworkAclEntry:
    Type: 'AWS::EC2::NetworkAclEntry'
    Properties:
      NetworkAclId: !Ref PrivateNetworkAcl
      RuleNumber: 100
      Protocol: -1
      RuleAction: allow
      Egress: false
      CidrBlock: '0.0.0.0/0'

  OutboundPrivateNetworkAclEntry:
    Type: 'AWS::EC2::NetworkAclEntry'
    Properties:
      NetworkAclId: !Ref PrivateNetworkAcl
      RuleNumber: 100
      Protocol: -1
      RuleAction: allow
      Egress: true
      CidrBlock: '0.0.0.0/0'

  # Associate Network ACLs with Subnets
  PublicSubnet1NetworkAclAssociation:
    Type: 'AWS::EC2::SubnetNetworkAclAssociation'
    Properties:
      SubnetId: !Ref SlawPublicSubnet1
      NetworkAclId: !Ref PublicNetworkAcl

  PublicSubnet2NetworkAclAssociation:
    Type: 'AWS::EC2::SubnetNetworkAclAssociation'
    Properties:
      SubnetId: !Ref SlawPublicSubnet2
      NetworkAclId: !Ref PublicNetworkAcl

  PrivateSubnet1NetworkAclAssociation:
    Type: 'AWS::EC2::SubnetNetworkAclAssociation'
    Properties:
      SubnetId: !Ref SlawPrivateSubnet1
      NetworkAclId: !Ref PrivateNetworkAcl

  PrivateSubnet2NetworkAclAssociation:
    Type: 'AWS::EC2::SubnetNetworkAclAssociation'
    Properties:
      SubnetId: !Ref SlawPrivateSubnet2
NetworkAclId: !Ref PrivateNetworkAclOr you can iteratively paste in the segments as I have them in the Lesson section above. That’s what I’ll show in this step by step. To start, click the radio button for Build from Application Composer, and then click Create in Application Composer:

This can be helpful when you are getting started with CloudFormation. It’s a drag and drop visual system. I rarely use it because I’ve been building templates for so long, but I find it helpful for debugging. From here click Template, which allows us to paste in the code I already wrote.

It will default to YAML but make sure:

Now copy and paste from the template snippets above (or cheat, paste the entire thing in at once, and feel guilty until your dying day, for letting me down). Then click Validate to make sure you didn’t introduce any errors.
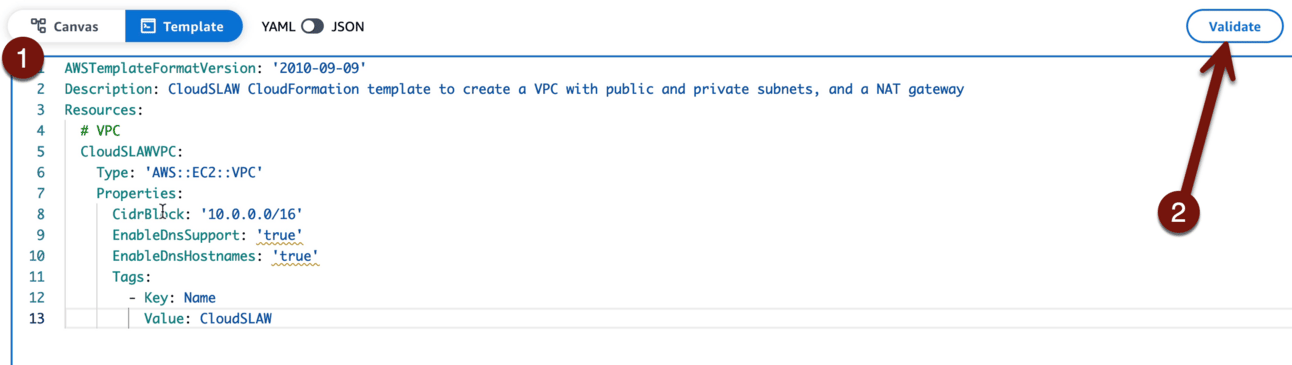
If you make a mistake it will tell you:

See how it tells me where my mistake is? In this case I can see that my resource isn’t lined up right — YAML cares about indentation (use spaces, not tabs, and I’m not going to argue).
Okay, to visualize everything I recommend you paste in block by block, based on how I have things broken out in the Lesson. After each block Validate and then click Canvas to see things more visually. Here’s what it looked like when I create the VPC and the Internet Gateway, and then what it looked like after I added the Internet Gateway Attachment:


The attachment really ties the room together
Okay — keep running through, and eventually it will look like this. Revel in the glory, and click Create template:

This will ask whether it should create a default S3 bucket to store the template. Anything you create with the builder is either stored in a new bucket, or you can pick an existing one. Follow the default, but I recommend you copy that URL down somewhere, to save time when we pull it up in a future lab.

This brings us back to the create stack page fills in the URL. Click Next, use CloudSLAW as the name of the stack, and click past the next screens until you reach Submit:

Click past a couple pages, then…

CloudFormation will do its thing. This will take a few minutes, but you might find the following three tabs interesting: Events is the stream of what it’s doing, Resources are all the resources created, and Template is the actual template. These are helpful if you ever need to do a security investigation of a rogue template. Ask me how I know.
Okay, when all that is done, go to VPC > CloudSLAW > Resource map. It should look like this, which should look just like what we built last lab, except with an extra route table. That’s because the VPC itself always wants a top-level route table with a local route. In our last lab we hijacked that for our public subnet, but this time we created a table for that subnet.

Pretty cool, eh?
NOW DESTROY IT ALL!!!
We definitely don’t want that NAT Gateway increasing our bill. Go back to CloudFormation > CloudSLAW > Delete:


You can now create and delete a fully functional VPC whenever you want. And hopefully this helped you understand a little more about how things work under the hood.
-Rich
Reply