- Cloud Security Lab a Week (S.L.A.W)
- Posts
- PBAC and ABAC? Write an Intermediate AWS IAM Policy
PBAC and ABAC? Write an Intermediate AWS IAM Policy
IAM is the single most important security skill anyone can learn. Let's jump into multiple statements and conditionals as we depend our IAM in AWS.
Rich Mogull
June 06, 2024 • Estimated Reading Time: 8 minutes
Prerequisites
Any AWS account
The Lesson
Imagine if you could limit a cloud administrator to only making API calls from a specific IP address, and only on resources with a certain tag? Well, today I get to make your imagination come true! (Sorta — I mean, hopefully you have bigger ambitions in life, but maybe not, and I don’t judge).
It’s hard for me to overstate just how important a deep understanding of IAM is if you are in security, operations, or development. I don’t just mean for cloud — IAM spans all of technology these days, down to every time you pick up your pocket supercomputer phone.
These labs all focus on AWS, but the skills and knowledge apply far more broadly. There’s a reason we started by covering the concept of entities and identities way back in our early labs.
Today I will briefly introduce three new foundational terms, then focus on practical AWS-specific knowledge for the lab.
Before I do that I need to untangle a little of the word salad we have backed ourselves into in security. You will often hear three terms used almost interchangeably: entitlements, authorizations, and access controls. We talked a bit about these in Write a Simple IAM Policy, but the TL;DR is access controls map to objects (like files or systems), authorizations map to actions (like AWS API calls), and entitlements are when you assign either to an identity.
In the real world we tend to intermingle these terms so much that it’s hard to tell the difference… and it doesn’t really matter!
I probably just pissed off a bunch of security policy wonks, but while I try to be good about my use of terminology, you will see those terms all jumbled up and used inconsistently depending on what you’re reading.
That’s okay, it really is — so long as we understand the principles and don’t screw up implementation.
Why that long intro? Because there are three new terms you’ll start seeing me use, and they totally demonstrate these linguistic tangles:
Role Based Access Controls (RBAC): Identities are assigned roles, and roles are assigned permissions. This is the most common implementation, and all of you have seen this in different systems. you are a “user” or an “administrator”, and that defines what you can do.
Attribute Based Access Controls (ABAC): Attributes of the identity or the resource are used to define what can be done. For example, user X can access any resource with tag Y.
Policy Based Access Controls (PBAC): We define all these in policies like the ones we’ve been working with. These policies are then assigned to identities or resources, and define what they can do. You can write your RBAC and ABAC into PBAC and… seriously, don’t blame me — I don’t make these things up.
I don’t expect you to memorize or even fully internalize these concepts yet. This is just the intro to get them in your head — I’ll reinforce them over time in labs.
For today just think about it this way. We are writing identity/resource/organization policies, which are PBAC. In some of those we might refer to an AWS group or role, which is kind of RBAC (Remember, AWS roles aren’t just groupings like they are in other systems, thus the little extra confusion. Azure is ALL RBAC by comparison).
Today we’ll learn a little about attributes and how to use them in conditionals, one of my favorite things in AWS.
Conditionals and Multiple Statements
We’ve played a little bit with policy conditionals and multiple statements, but barely talked about them. Here’s a diagram of a basic IAM policy structure (it’s most everything, I just left out Principals, which is mostly for resource policies, not the identity policies we are working with today):

A policy is a list of statements; each statement is an object with allow/deny, the list of actions allowed or denied, which resources it applies to, and any conditions.
To review, here was our old policy:

Simple. One statement, two actions, and one resource. Translated, this allows you to read or write objects to the identified S3 bucket. Now let’s look at a more complex policy I randomly generated with AI because I’m being lazy:

That orange line shows the divider between two different statements. So one policy, with two different authorizations. And that red box? Inside that is our first conditional. This is our introduction to Attribute Based Access Controls.
Some people like to say Attribute Based Access Control is just about putting tags on resources, and then controlling access based on those tags. But we have many more attributes we can build into IAM policies! Like this one, which says “allow any of the S3 API calls to any S3 bucket in the account if the API call is made from any IP address on the 192.9.2.0 network”.
ABAC is a two-way street. We can set the rules based on attributes of the entity making the API call, but also based on attributes of the resource they are working with. Sound complex? It sure is! It’s what I like to call “job security”.
We already saw some conditionals in our CloudTrail setup labs, and they’ve popped up in some other places where AWS generated our policies. Today we will write our own for the first time.
Conditionals in IAM policies have two main components. The condition key, and the condition operator. Condition keys can be global (they mostly work everywhere, like that SourceIP) or service-specific (conditions which only apply to S3, EC2, or other services). Here’s a table of global condition keys from the AWS documentation:

There are also a bunch of condition operators including ‘StringEquals’, ‘StringNotEquals’, and booleans. This post is already long, but you can review them in Amazon’s user guide. It’s basically a little programming language — with wildcards, evaluation logic, etc. I don’t think it’s Turing-complete, but I do think it’s sentient, based on the amount of human suffering it can cause.
But conditional logic in policies enables amazing security things, like locking down access to only approved IP addresses, requiring MFA for specific API calls, or setting rules based on tags. The complexity is astounding, but to me it’s worth it. I really don’t want to make it sound like all rainbows and unicorns — going deep into AWS IAM is demanding, but even simple conditionals can go a long way, and it’s a topic you can learn slowly.
Personally, the most common basic attributes I use in policies are IP addresses and tags.
Oh, I forgot to mention multiple statements. Those just let us cram more things into a single policy, instead of writing them in multiple policies. And as a reminder, the net result of IAM policies is the logical sum of all statements, and any deny statement overrides any allow statement. Meaning you add together all the allow statements, accounting for conditionals, subtract the deny statements, and the end result is what you can actually do.
Lesson Key Points
AWS supports all the latest and greatest IAM concepts, including RBAC, PBAC, and ABAC. Somewhere I heard AWS fully supports PEBCAK too!
Policies are at the core of IAM. We encode RBAC and ABAC rules into policies.
Conditions enable us to write more complex IAM logic, such as restricting an API call to just one IP address, only when the user logged in with MFA. As powerful as this is, it also adds complexity, which takes time to learn.
The Lab
We will write an IAM policy with two statements and one conditional. This is still pretty simple, but once we introduce conditionals I’ll call it an intermediate level of complexity.
This policy is a total throwaway — we won’t ever actually use it, it’s just an opportunity to learn skills that you will need later. Our policy will:
Allow you to start and stop instances
Allow you to “describe” anything in EC2
Deny terminating instances if you are at your home IP address
Huh? No, none of that really makes sense. Technically I should have you deny terminating unless it’s from your home address, but I don’t want to get into double negative logic again today. Again, this policy is just a learning exercise.
Video Walkthrough
Step-by-Step
Sign into your Identity Center portal as usual, then pick your TestAccount1 and AdministratorAccess. We are using this account because we are testing out a capability, and don’t want to leave artifacts lying around in a production account.

Then go to IAM and Policies. From here click Create policy:

On the Specify permissions page, select JSON. This will let us see the JSON as we write the policy. It’s a relatively new feature of the console, and I like it much better than the visual policy editor:

Get used to typing into the search fields and then checking the boxes. In this case type in ec2 into the service box and click… EC2. EC2 is the service for running virtual machines (instances), which context will make sense in a second.

Now add StartInstances and StopInstances by searching on those API calls and then checking the boxes. Once you check a box it’s added to the policy — there’s no Save button to worry about. You can see this as the policy builds on the left side of the screen:

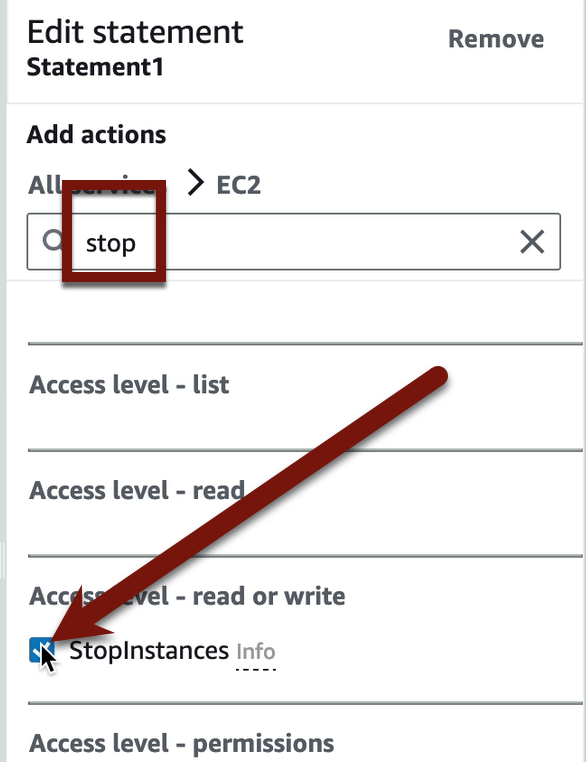

It will look like this with both actions listed
Now we want to “describe anything”, which means we will use a wildcard. You can just type that into the window on the left in the right place, or just pick any other Describe action and delete out the bits at the end and replace with a *. That’s what I did, and here’s what it looks like:


Select “Addresses” and delete

Replace with *
This will error out if you don’t specify a resource or enter the * wildcard. Click Add a resource and then All resources on the Resource type dropdown. Then click Add resource:


You need to click Resource type to pop up this list.
Now let’s add our Deny statement. Click Add new statement:

Statement2 will appear after you click.
I’m absolutely sure there is some way to switch to a Deny statement, but I haven’t found it yet. Select Allow in the JSON text, and change it to Deny. If you messed up and accidentally delete a quote or something, it will give you a nice error warning.

Now run through the same process again. Pick EC2 as the service, and this time we want the action TerminateInstances. Then click Add a resource and choose All resources again. To save space, I’ll only show the step to choose TerminateInstances:

Now it’s time to add our condition. First get your IP address. I tend to use whatismyip.com. Honestly, for this lab any Internet accessible IP will work. Then Add a condition:


The Condition key we want is aws:SourceIp, which is the IP address where the API call comes from (e.g., your house):

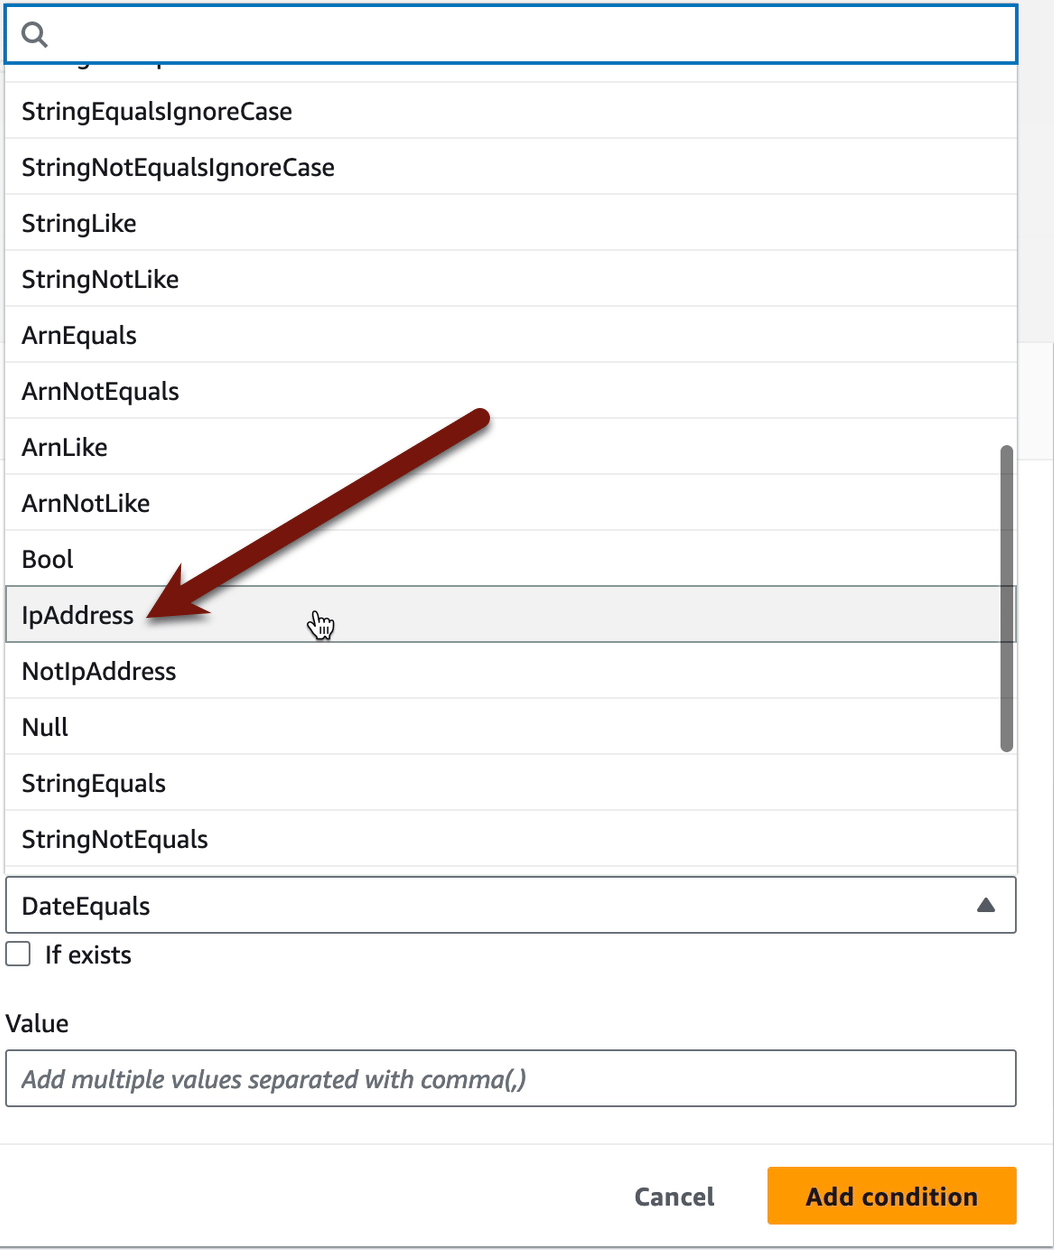
Ignore the Qualifier — we don’t need that. But click Operator and select IpAddress. Then enter your IP address in the Value field and click Add condition:

When you are done the policy statement will look like this, and you can see the conditional. Conditionals can get a little tricky — it’s important to understand that the “IpAddress” is a specific type of condition (it isn’t treated as a string or number). The interpretation of this JSON is:
“The IpAddress that comes from the SourceIp of an API call must have the value of 193… “

Just as an example, here’s a condition to require a tag with the key ‘status’ and value ‘production’:
"Condition": {
  "StringEquals": {
    "aws:RequestTag/status": "production"
  }
}
See the difference? In the IpAddress one, it knows to make sure the IP address matches (that’s the operator). In this tag condition, the operator is ‘StringEquals’, so we need to specify the key and value.
It gets easier.
Honestly, you could stop here, but to save the policy click Next in the lower right corner, then name it DeleteMePleaseNow, and then Create policy. This was all just a made-up example which you should delete. But as a final review, here’s what it looks like and what it does (the top is clipped a bit due to the window size):

Allow someone/something to start and stop ec2 instances, and to describe anything in the ec2 service. Block them from terminating an ec2 instance if they are in your house! Get out! Sorry, been watching a horror TV show.
And there you have it. We wrote a policy with an attribute-based access control. The attribute is your IP address. And while we used Deny statements for no particular reason today, hopefully you see how powerful this could be with Allow statements.
But don’t play with those yet, because I haven't covered important parts like how when you log into the console, that’s the IP address that shows up in the logs, not your IP address.
Phew. I thought this would be a short one, but instead it’s one of our longer lessons. This really is a tough topic, which is why we’ll keep attacking it from different angles.
Lab Key Points
‘Conditions’ in IAM policies enable you to set rules based on attributes.
Learning how to work with JSON directly is an important skill, but the JSON policy editor works well to guide you in the right direction and validates your syntax as you go.
Any condition will use a condition key. There are global keys and per-service keys.
-Rich
Reply