- Cloud Security Lab a Week (S.L.A.W)
- Posts
- Secure a Role Chain on Both Sides
Secure a Role Chain on Both Sides
In this lab we'll learn how to tightly control our autoremediation role to prevent abuse, and use StackSets to push it out to only where we need it.
Rich Mogull
March 20, 2025 • Estimated Reading Time: 9 minutes
CloudSLAW is, and always will be, free. But to help cover costs and keep the content up to date we have an optional Patreon. For $10 per month you get access to our support Discord, office hours, exclusive subscriber content (not labs — those are free — just extras) and more. Check it out!
Prerequisites
This is part 6 of the Advanced Cloud Security Problem Solving series, which I’ve been abbreviating to Epic Automation. If you haven’t done parts 1-5 yet, jump back to the first post in the series and complete all prior posts before trying this one.
The Lesson
I’m one of those people who, as I get older, definitely suffers the consequences of not sticking to the good habits everyone told us to start when we were younger.
Yes, I’m talking about flossing.
You see, the tap water where I grew up was very good and highly fluoridated. I’d never had a single cavity when I started college. TL;DR, I paid the price later in life. You haven’t lived until you’ve been on a work trip to some remote client location, and needed to get an emergency crown thanks to a protein bar.
And let’s stop pretending that any of you are thinking this analogy is about anything other than IAM.
Way back in Assume the Role! we learned about IAM roles and cross-account access. In this series we have already created a centralized role for our cross-account EventBridge. But I kinda glossed over a couple of details, one of which is both important and often missed when setting up a centralized service, like we are.
Let’s review the diagram from that first role assumption lab:

As a reminder, in that case an IAM user had permission to assume a role in another account. The IAM user needed the sts:AssumeRole permission in their IAM policy, and the remote account needed a Role Trust Policy to allow that IAM user to assume it. You need permission to assume roles, and the specific role needs to allow the identity to assume it. You need permissions on both sides.
Because of how we’ve done most things in the console, these permissions have often been defaulted for us. They have also been a little over-provisioned in some cases. For example we allow sts:AssumeRole but don’t restrict it to only assuming a single role.
Now it’s time to take things a bit further, especially since we are enabling code (our lambda function) to change things across multiple accounts. There are some interesting things we can do to lock things down tight, and limit the potential for privilege escalation.
Locking down both sides of a role chain
To enhance security we will add conditions on both sides of the relationship:
Only our designated lambda function will be able to assume the lambda role. Other functions can’t use it (the default when using the console and in most examples).
Our lambda role will only be allowed to assume target roles which have a specific path we will consistently use in every account. (With a wildcard for the account ID).
Our lambda role will only be allowed to assume those roles in the specific OU.
Our target roles in each account will only allow the centralized lambda role to assume them.
Again, we’ve seen hints of how this works, but today is the day to call out the details. It absolutely takes more time and a bit more knowledge to set up. But it means the privileged role in a bunch of accounts, with permissions to change things, can’t be used by anything other than the expected lambda function, and that function can’t be abused to assume any role other than the intended one.
Even I often get my neurons tangled up as I work through where I need to put all the right pieces, so here’s a simple way to keep things straight in your head when having roles assume other roles (we call this role chaining — and yes, this also applies to other principals assuming roles, but I want to keep it simple today):
To do anything, your lambda function first needs its “lambda execution role” which is the role that allows it to do anything. The lambda service performs an AssumeRole for you. Then, for an entity with a role in one account to do things in another account, it needs to assume a role in that other account.
This process of using one role to assume another role is called “role chaining”, and we use it a lot!
In terms of what it can do, remember that all IAM permissions policies live in the account where the actions are happening. You can’t just do something like “PutBucketPolicy” from a central account, because permissions policies are attached to the IAM principals, and that principal doesn’t exist in the target account so there is no way to define what it can and can’t do. Your role chains, but your permissions are always limited to whatever is at the end of the chain. This diagram might help you visualize it:

Or not — I’m no graphic designer.
Remember that AssumeRole is a way of creating a session, and the AssumeRole API call returns temporary credentials: an Access Key, a Secret Access Key, and a Security Token. When you role chain you are gathering these at every step, and your permissions are limited by which permissions are associated with whatever set of credentials you use to make an API call. Obviously those only work in the account where that role lives, and you never inherit permissions from anywhere else on the chain!
Honestly this is easier to see when you are coding, since in code we specify the session used to make the API calls.
It’s easy to get confused because you need sts:AssumeRole in the permissions policy of the role which wants to assume another role. And we also need sts:AssumeRole in the trust policy of the role being assumed.
It’s not that hard when you think about it: “I need permission to assume roles” and “I give you permission to assume me”.
What’s cool is that we can put restrictions on that source role’s permission policy to assume roles, limiting which roles it can assume, and we can put restrictions on the target role’s trust policy so that only a specific source role can assume it. Both sides are locked down so no one else can shove their way into the relationship. I could have used that in college.
We will also use the role trust policy to restrict the lambda service so it can only assume this role for our security-auto-s3 lambda function. This ensures that no other lambda functions can use this role to muck around with S3 in other accounts.
Let’s see what these policies look like. To start, here’s the permissions policy for our source role.
{
  "Version": "2012-10-17",
  "Statement": [
    {
      "Effect": "Allow",
      "Action": "logs:CreateLogGroup",
      "Resource": "arn:aws:logs:us-west-2:730335263677:*"
    },
    {
      "Effect": "Allow",
      "Action": [
        "logs:CreateLogStream",
        "logs:PutLogEvents"
      ],
      "Resource": [
        "arn:aws:logs:us-west-2:730335263677:log-group:/aws/lambda/security-auto-S3:*"
      ]
    },
    {
      "Effect": "Allow",
      "Action": "sts:AssumeRole",
      "Resource": "arn:aws:iam::*:role/SecurityOperations/SecurityAutoremediation",
      "Condition": {
        "ForAnyValue:StringLike": {
          "aws:ResourceOrgPaths": "<your org path>/*"
        }
      }
    }
  ]
}
The top part is what we started with last week, and just says the lambda function can write its logs to CloudWatch.
The meat is the sts:AssumeRole part. This says the role can only assume a role named /SecurityOperations/SecurityAutoremediation (as a reminder using paths keeps things cleaner, and we will use that later when we protect this role with an SCP). But it can assume that role in any account where that role exists, thanks to “*” in the Resource path.
Not only can it only assume that role, but notice that extra condition with ForAnyValue:StringLike? That’s to further restrict it so it can only assume that role in our Workloads Organizational Unit! Even if someone created that role in, say, our Security OU, they still couldn’t assume it. We like things nice and locked down.
Here’s what the source role’s trust policy looks like. Notice how it only allows the lambda service, and only our named function (thanks to the aws:SourceArn condition key)?
{
  "Version": "2012-10-17",
  "Statement": [
    {
      "Effect": "Allow",
      "Principal": {
        "Service": "lambda.amazonaws.com"
      },
      "Action": "sts:AssumeRole",
      "Condition": {
        "StringEquals": {
          "aws:SourceArn": "arn:aws:lambda:us-west-2:<SecOps account ID>:function:security-auto-S3"
        }
      }
    }
  ]
}
Now let’s look at the target role. In this case we use the role trust policy to ensure that it can only be used by that one source role, with the ARN hard-coded in. (This is a snippet from the CloudFormation template we will use to create the role in the target accounts. I’m skipping the rest for brevity.)
Resources:
  SecurityAutoremediationRole:
    Type: 'AWS::IAM::Role'
    Properties:
      RoleName: SecurityAutoremediation
      Path: /SecurityOperations/
      AssumeRolePolicyDocument:
        Version: '2012-10-17'
        Statement:
          - Effect: Allow
            Principal:
              AWS: !Sub 'arn:aws:iam::${SecurityOperationsAccountID}:role/lambda-slaw-s3'
            Action: 'sts:AssumeRole'
Look at AssumeRolePolicyDocument, which is the trust policy. It has Allow and then requires an ARN: the ARN of the lambda role in our SecurityOperations account (remember that !Sub is you’ll swap in the account ID, since you’ll be running this from my S3 bucket).
And I’ll skip the permissions policy — you’ll see it in a minute, and it’s just the usual S3 API calls.
This image shows how it all works together:

In the SecurityOperations account:
In the lambda-slaw-s3 role we created for our lambda function:
Only the specific lambda function can use this role. The role trust policy only allows the lambda service, when working on behalf of the security-auto-s3 lambda function, to sts:AssumeRole.
When assumed, this returns session credentials to the lambda function.
The permission policy on the role which the function is now using only allows the function to assume a role named SecurityAutoremediation in any account in our organization where it exists. But…
We added a condition to restrict it to only assuming this role if it is in our Workloads OU.
In the Target Workload account:
We have a SecurityAutoremediation role.
With a role trust policy which only allows our SecurityOperations lambda-slaw-s3 role to assume it.
With permissions to make certain S3 API calls.
For the lambda function to make an API call on a target account:
The lambda service assumes the lambda-slaw-s3 role.
This returns session credentials to our running function.
The function uses those credentials to assume the SecurityAutoremediation role.
That returns a different set of session credentials, which enable the function to make those S3 API calls.
The chain breaks whenever any of those sessions expires (the default is 1 hour).
This pattern is the flossing of cross-account access. We restrict both sides of the relationship, but in a way which still allows us to work across multiple accounts. This is another reason a good OU structure is so important, and having a good mental model for how to use both role trust policies and permissions policies together.
Key Lesson Points
Role chaining enables us to use one role to assume another role… and then that role can assume the next role in the chain.
We use role chaining to go from one account into other accounts. It’s the basic way to build the IAM for security automation.
Trust policies define who or what can use a role, and we can lock that down pretty specifically to prevent the role from being abused.
A role’s permissions policies must include sts:AssumeRole if you want to use it to assume other roles. We can also put resource restrictions and conditionals on it, to further lock down both sides of the relationship.
The Lab
If you managed to read this far, you know what’s coming. We will:
Update the permission policy of our lambda execution role so it can assume roles, but only one role, only in one OU.
Update the trust policy of the lambda execution role so it is only usable by our named lambda function and not others.
Use StackSets to push out our target/security automation role into our Workloads OU.
Video Walkthrough
Step-by-Step
First we need to build the path to our Workloads OU so we can use it as a condition later. Start in your Sign-in portal > CloudSLAW > AdministratorAccess > Organizations. Then collect your organization ID, the root OU ID, and the Workloads OU ID:

Just paste that string someplace — we’ll need it later. When you specify an OU using a global condition key, you need to use the entire path like this: o-0sqvc6dvj1/r-na6s/ou-na6s-ag0wxvj3/*
With that out of the way, let’s start changing our various permissions. Go to your lambda execution role (the one the lambda function will always use): Sign-in portal > SecurityOperations > AdministratorAccess > IAM > Roles > lambda-slaw-s3:

Click Permissions policies > lambda-s3 > Edit:

Copy this policy, substitute in your Account ID twice and your org path, and paste over the existing policy. As a reminder, you can get your current account ID by clicking in the upper-right corner dropdown in the AWS console.
{
  "Version": "2012-10-17",
  "Statement": [
    {
      "Effect": "Allow",
      "Action": "logs:CreateLogGroup",
      "Resource": "arn:aws:logs:us-west-2:<your account ID>:*"
    },
    {
      "Effect": "Allow",
      "Action": [
        "logs:CreateLogStream",
        "logs:PutLogEvents"
      ],
      "Resource": [
        "arn:aws:logs:us-west-2:<your account ID>:log-group:/aws/lambda/security-auto-S3:*"
      ]
    },
    {
      "Effect": "Allow",
      "Action": "sts:AssumeRole",
      "Resource": "arn:aws:iam::*:role/SecurityOperations/SecurityAutoremediation",
      "Condition": {
        "ForAnyValue:StringLike": {
          "aws:ResourceOrgPaths": "<your org path>/*"
        }
      }
    }
  ]
}
It will then look like this, but with your IDs, not mine! Then click Next, and on the next page click Save changes:

New you need to adjust the role trust policy. Click Trust relationships > Edit trust policy:

You’ll need that account ID again, and this time copy this policy, replace the account ID, and then paste the policy into the window > Update policy:
{
  "Version": "2012-10-17",
  "Statement": [
    {
      "Effect": "Allow",
      "Principal": {
        "Service": "lambda.amazonaws.com"
      },
      "Action": "sts:AssumeRole",
      "Condition": {
        "StringEquals": {
          "aws:SourceArn": "arn:aws:lambda:us-west-2:<SecOps account ID>:function:security-auto-S3"
        }
      }
    }
  ]
}
Now it’s time for the easy part. We’ll use StackSets to push out our SecurityAutomation role, which has permissions to make changes in the accounts. When we do this, we’ve also set it to use the /SecurityOperations/ path, which helps keep things organized.
Go to CloudFormation > StackSets > Service-managed > Create StackSet:

Paste in this template URL and click Next:

Name it AutoremediationRole, provide the description, then Copy & Paste the Account ID, like we’ve been doing. Then click Next:

Click the checkbox > Next:

Then Deploy to organizational units > Paste in your Workloads OU ID, which you previously copied. Previously we deployed our role for central event collection everywhere, but for autoremediation (which will change things, and could break things) we want to be more cautious.

Pick US East as the region, then Next. Don’t worry about concurrency — there are only 2 accounts within that OU.
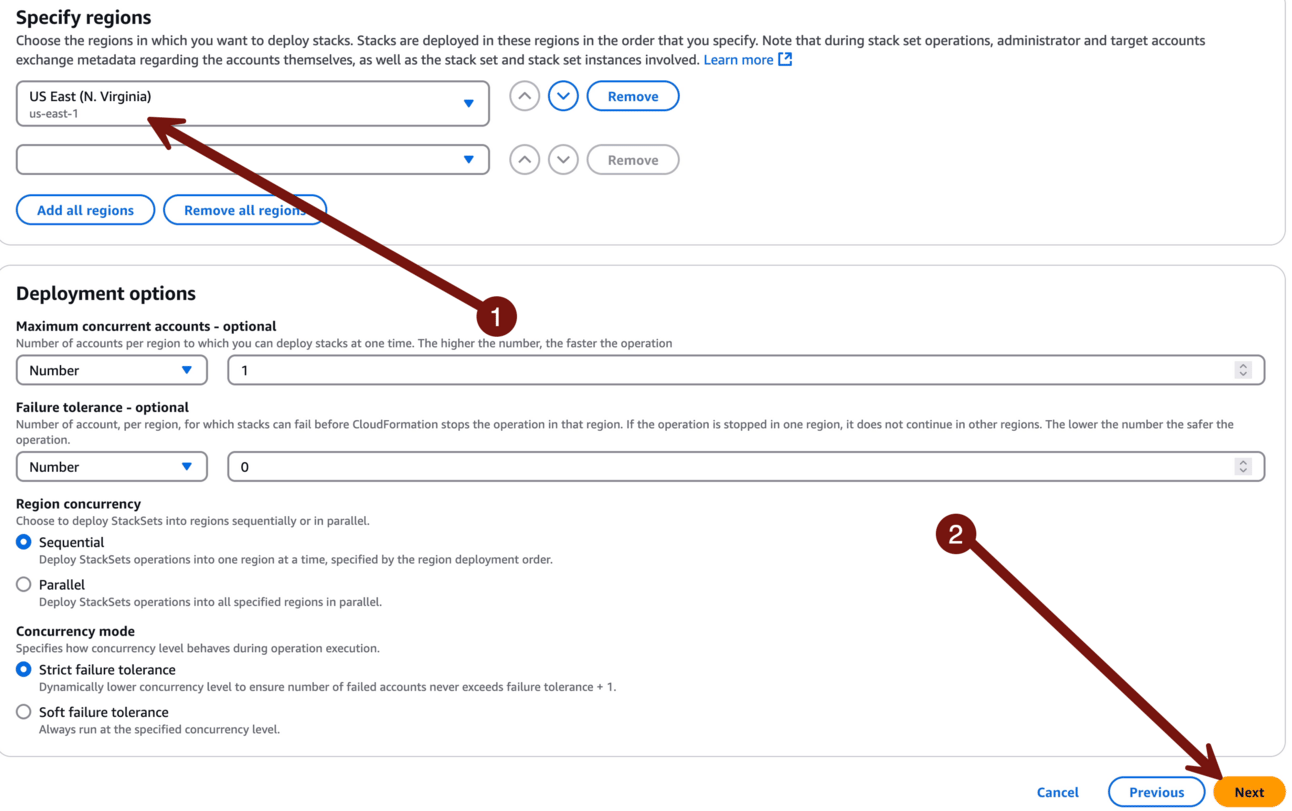
On the next page click Submit. No screenshot for you — it’s, like, a big button in the corner. You can figure out which corner. I have confidence in you.
It will take a few minutes, but you can click Stack instances to track the deployment and see when it’s finished:

If you click Template: as you can see we have a block of permissions for S3 read actions, and a second block for write actions.
One last point: you’ll notice that we named everything S3 for the lambda and the role over in the SecurityOperations account, but this template creates a generic SecurityAutoremediation role in all target accounts. Why? Because down the road we will add more automated guardrails, but we don’t want to stuff accounts with different roles for each service. We will update this role with more permissions, and then limit what the automation lambda can actually do by inserting an inline policy called a session policy. You’ll see how that works once we get to writing the code.
-Rich
Reply