- Cloud Security Lab a Week (S.L.A.W)
- Posts
- Tame Findings and Use Your CSPM as a Threat Detector
Tame Findings and Use Your CSPM as a Threat Detector
I don’t understand why most people look at a CSPM only as a vulnerability scanner, but not as a threat detector. We'll cover a smidgeon of prioritizing CSPM findings, then create and investigate an incident.
Rich Mogull
December 18, 2025 • Estimated Reading Time: 6 minutes
It’s been 2 years, take a breather!
CloudSLAW is kind of weird because the newsletters go out in order, starting from the first lab, no matter when you sign up. I think that’s the best way to learn — from the start — but it means some labs could be out of date by the time you hit them, especially after 2 years.
Well, I can’t have that!
After I publish this lab I will take about 6-8 weeks to fix a handful of labs that need updates. If I had a team I’d redo all the ones on the “old” AWS UI, but that isn’t realistic for just me. Instead I’ll focus on labs with breaking changes.
Then, when I return to current topics, I’ll focus on more “atomic” labs which don’t require a year or more of previous labs to get up and running. It’s time to improve the long-term accessibility of this experiment.
Prerequisites
Our lab on deploying a commercial CSPM (FireMon Cloud Defense) and your FireMon credentials.
The Lesson
If you’ve been following along with these labs, you might remember we covered the different categories of cloud threat detectors. We then followed with labs on threat detection using logs and events, but I only threatened (haha) to cover detection using configuration.
<batman voice> I don’t make threats; I make promises. </batman voice>
Yeah, alright, maybe I’m overdoing the drama. Anyway…
Although this lab is focused on threat detection, I actually want to cover two topics.
Managing CSPM Findings
CSPMs and Cloud Native Application Protection Platforms (CNAPP, which adds workload and other tools to CSPM) aren’t really traditional vulnerability scanners because they look for misconfigurations, but they do share one trait. They tend to find… a lot… of things. Like, a LOT. But like a vulnerability scanner, not all of them are of equal value, and not all are relevant in the context of your given deployment.
For example most tools look for default NACLs, which we didn’t cover because I never use them. This finding will appear once for every subnet you have. It isn’t a misconfiguration, it’s a reasonable choice, but all the tools look for it since someone slapped it into some industry benchmark.
Looking at my current CloudSLAW org scan with Cloud Defense, I have 138 critical and high misconfigurations.

That number is right, but in a non-useful way. I probably only care about a handful of those. Having helped build a CSPM, the problem as the vendor/maintainer is that you need to be comprehensive, but you will never have enough context. We saw this in our Prowler scan as well.
Okay, so how do I prioritize? I always start by looking for the Big Gaping Security Holes, then correlating findings with my high-value accounts:
Static credentials (IAM users)
Users/roles with full admin credentials
Anything public
I work my way down the list eventually, but at the start if you keep a laser focus on the main ways you get exploited (public and IAM stuff) it really helps you filter out the noise. I also override severities to meet my own preferences, with tools which support this.
I suggest you poke around your own findings. We don’t really have time for depth in this lab, but here’s the challenge which I’ll walk through it quickly in a sec when we log in:
Identify and remediate any security group with port 22 exposed to the Internet. That’s a BGSH, so see how fast you can find and fix it.

CSPM for Threat Detection
I think we all agree that big holes are bad, but what does that have to do with threat detection? Well, the evidence from multiple cloud providers and incident response teams consistently shows that the main vector for attacking cloud is to steal credentials and use them to create misconfigurations which expose data or allow them to hijack resources.
For example, if an attacker steals an access key/secret key which allows them to change a security group, they can open up port 22 and start attacking an instance directly. Or they’ll make something public, or share it with an account under their control. There are… a lot of options. Thus…
A misconfiguration may be your first and best indicator of attack!
An attacker in the management plane will change things in ways that probably don’t look right. The faster you can detect and respond, the better. They aren’t just brute forcing virtual machines, they are stealing credentials using infostealer malware and then using those credentials to change configurations to steal or damage you.
Imagine you detect a public S3 bucket full of customer data. Is that a mistake? Someone violating policy? An attacker using an employee’s credentials to steal data?
Yeah, GuardDuty will probably detect my super obvious example, but the list is much longer (actually infinite). Like taking a snapshot of an instance with customer data and sharing it with an account under the attacker’s control.
Any CSPM can help augment threat detection, but I prefer ones with two capabilities: real-time detection, and capture of management plane API calls. Depending on your tool of choice, it might support real-time but that may not be the default deployment option, so just be aware it isn’t supported by all tools and might require manual enablement.
Also, not every CSPM’s findings are good for threat detection. We don’t have time to get into all the options today, especially since they also change based on your particular environment.
Key Lesson Points
When getting started with CSPM, focus on the Big Gaping Security Holes to reduce overload.
CSPM is an excellent source for threat detection, since it identifies the outcomes (misconfigurations) of activities attackers use to compromise cloud.
The Lab
First I’ll walk through finding a BGSH (Big Gaping Security Hole) and then we’ll create an exposure and investigate it in real time.
Video Walkthrough
Step-by-Step
Open up 2 tabs, and then log into your Sign-in portal and https://defense.prod2.firemon.cloud.
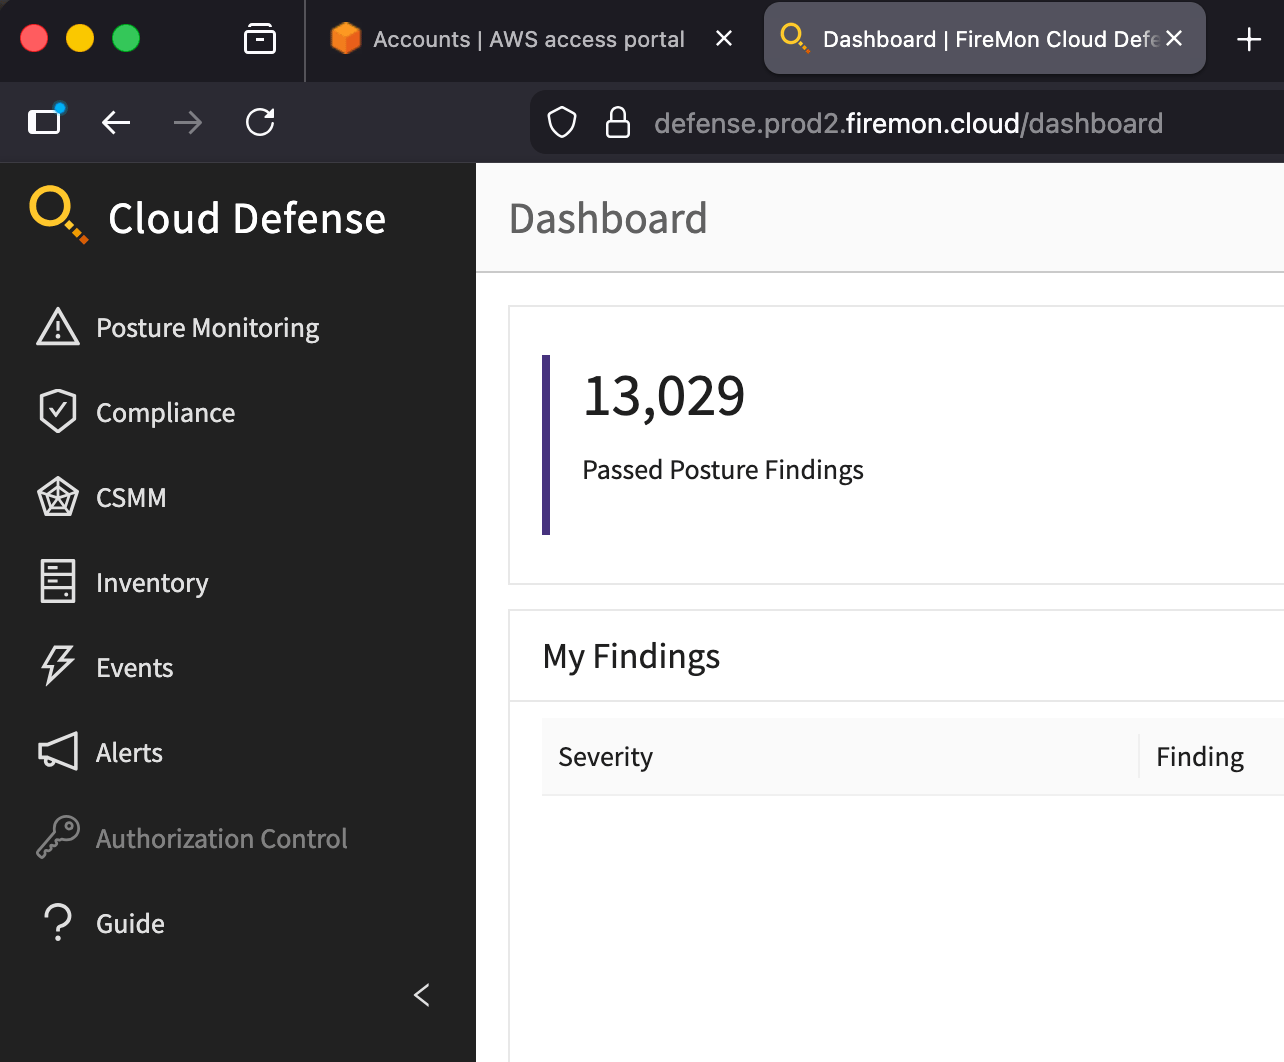
We’ll start in Cloud Defense and find one of those BGSHs. This time, a security group with port 22 exposed to the Internet. Start in Posture Monitoring > Checks > Security Group Allows Unrestricted Access to Ports with High Risk:

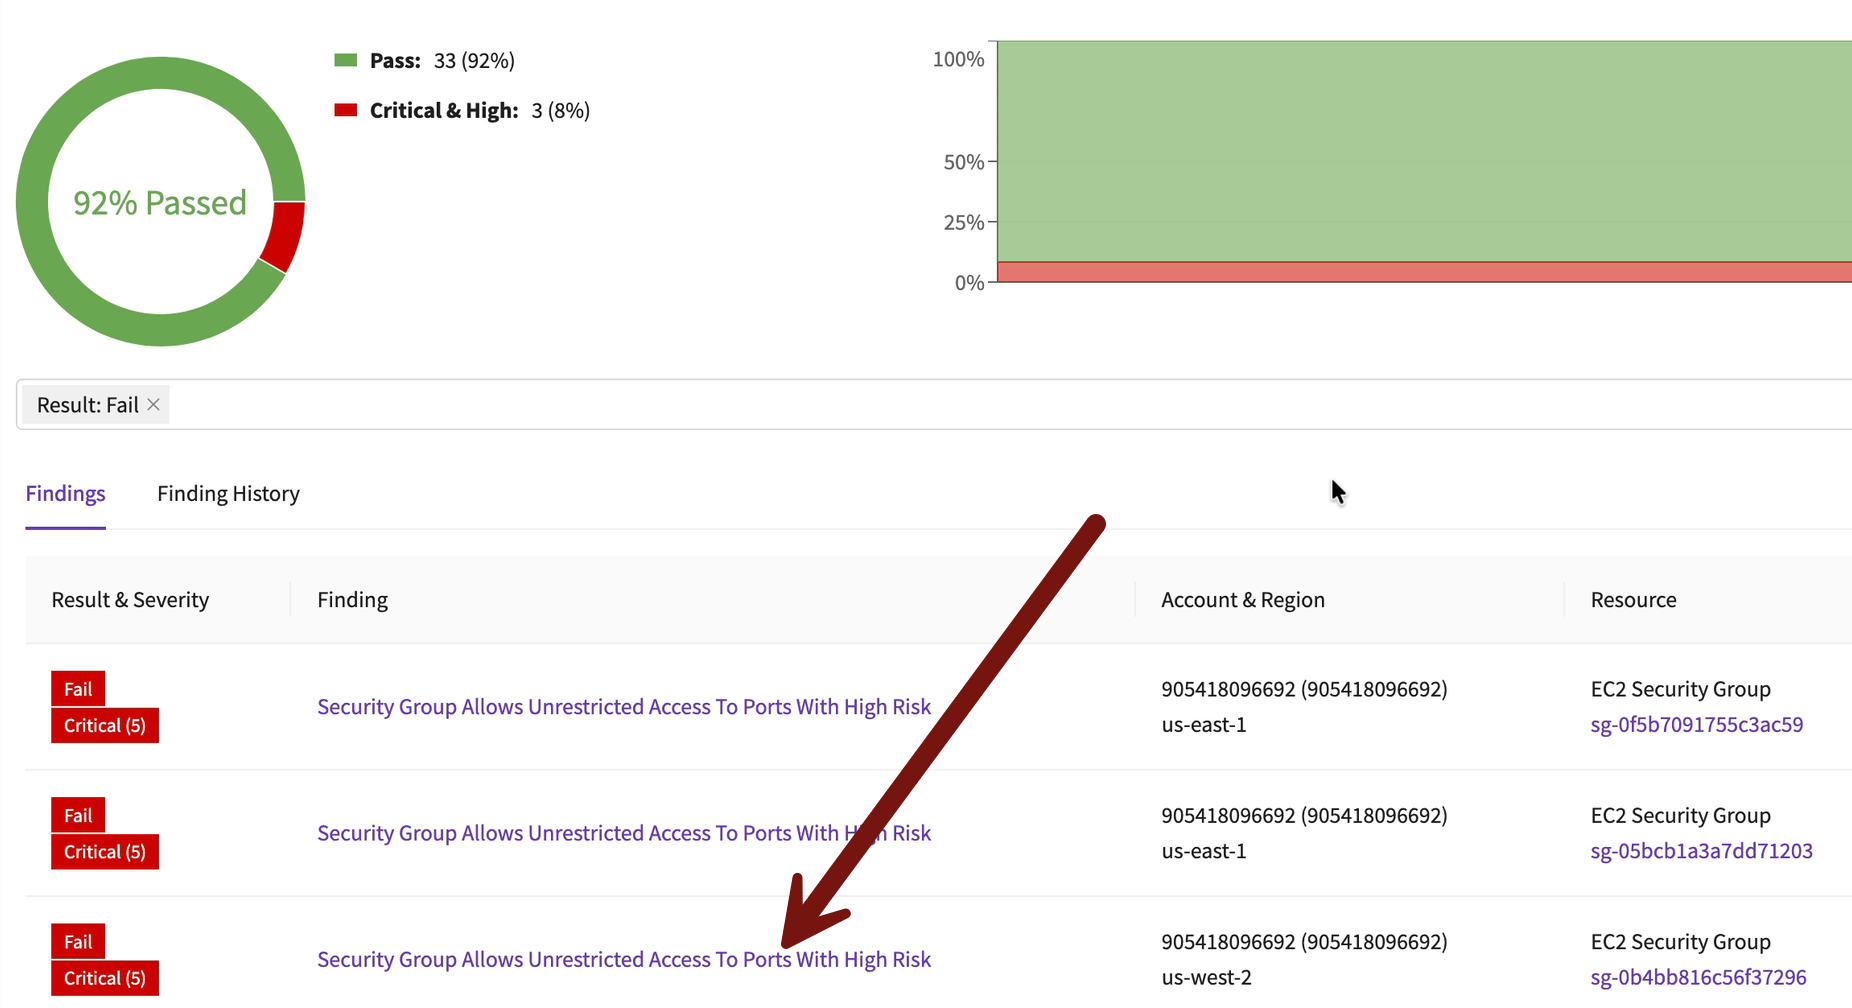
I like the Checks view for identifying systemic issues, since it quickly shows you which posture checks have the most findings. In this case that sliver of red is for failing security groups. See a lot of red in the bar? That’s one where you consistently fail.
Scroll down and drill down to see the exact exposed security group. I picked the one in Oregon. With the account ID and region we can quickly access the offending account for remediation:
I’m jumping through quickly, but you should be able to follow along.

From there it’s easy to go into that account and region. Here’s a hint: it will be your TestAccount1 account and Oregon. Delete that rule from the security group in the AWS console.

Within a few seconds it will show is Pass in Cloud Defense, but the failure will still show up in the history.
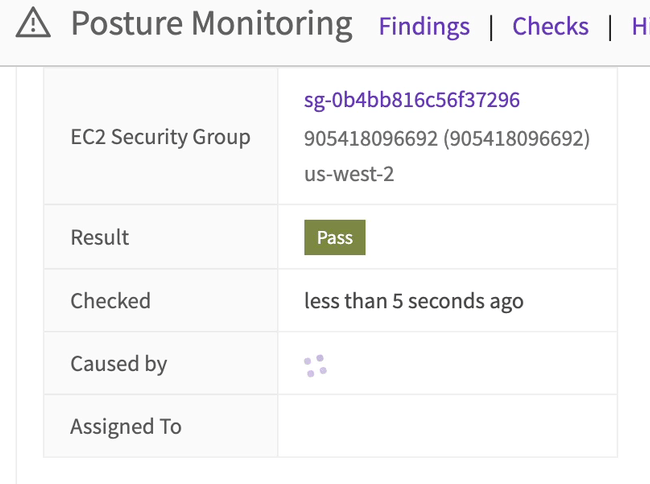
Yeah, real-time is pretty cool.
Okay, on to threat detection!
First we need to set up email alerts. Click the user icon in the upper right corner > User Settings:

You’ll need to set a day and time for scheduled alerts, but don’t worry, we won’t enable them. Instead just check Send CSPM alert emails > Save:

Now go to Posture Monitoring > Alerts > + Alert:
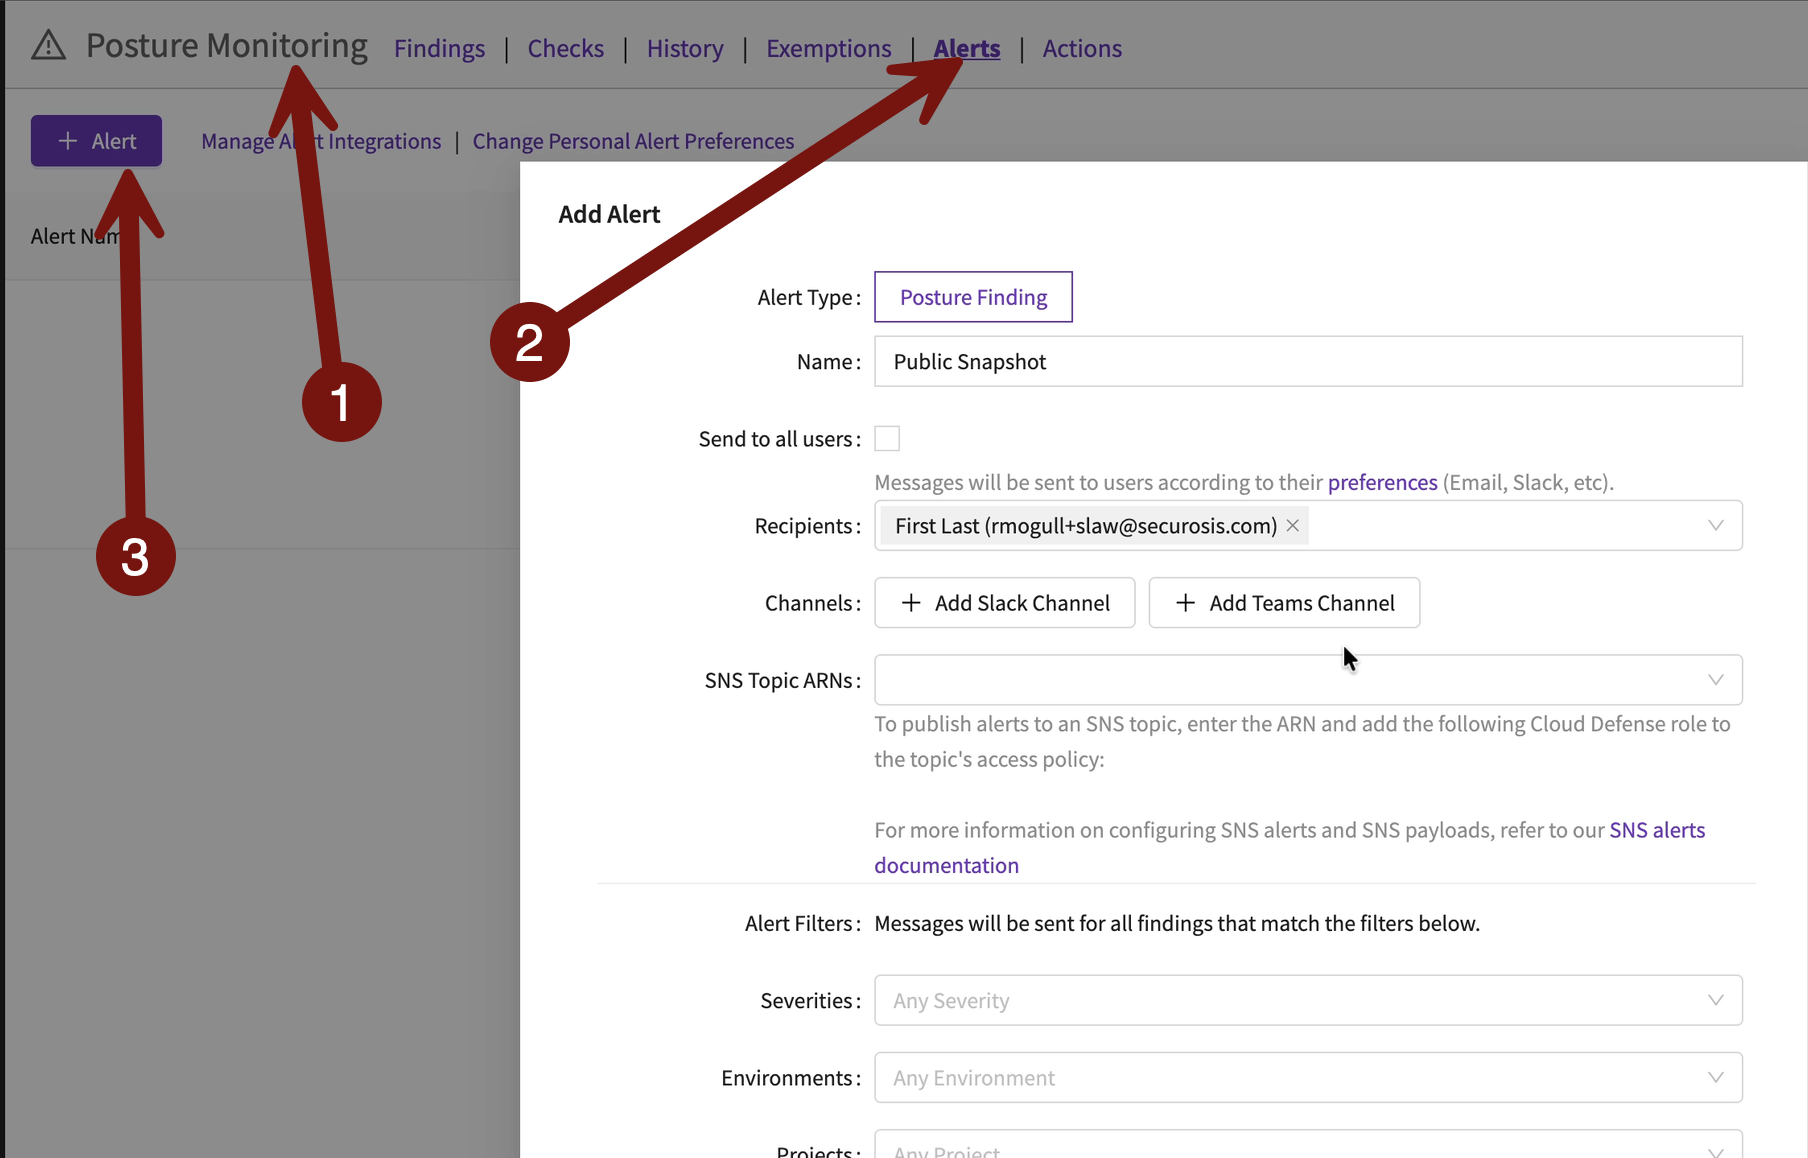
Let’s build an alert for anytime a snapshot becomes public.
We only need to change 2 settings to alert on a specific finding. Set results to “Fail”, and Checks to “EBS Snapshot is Publicly Accessible”:

Now let’s trigger it. Sign-in portal > TestAccount1 > Oregon region > EC2 > Snapshots > check the one labeled CSI-incident-1 if you have it. If not? Any snapshot will work. Don’t have one? Go to Volumes, pick one, and create a snapshot. Don’t have a volume? Launch an instance (any instance) and then snapshot. Then Modify permissions:
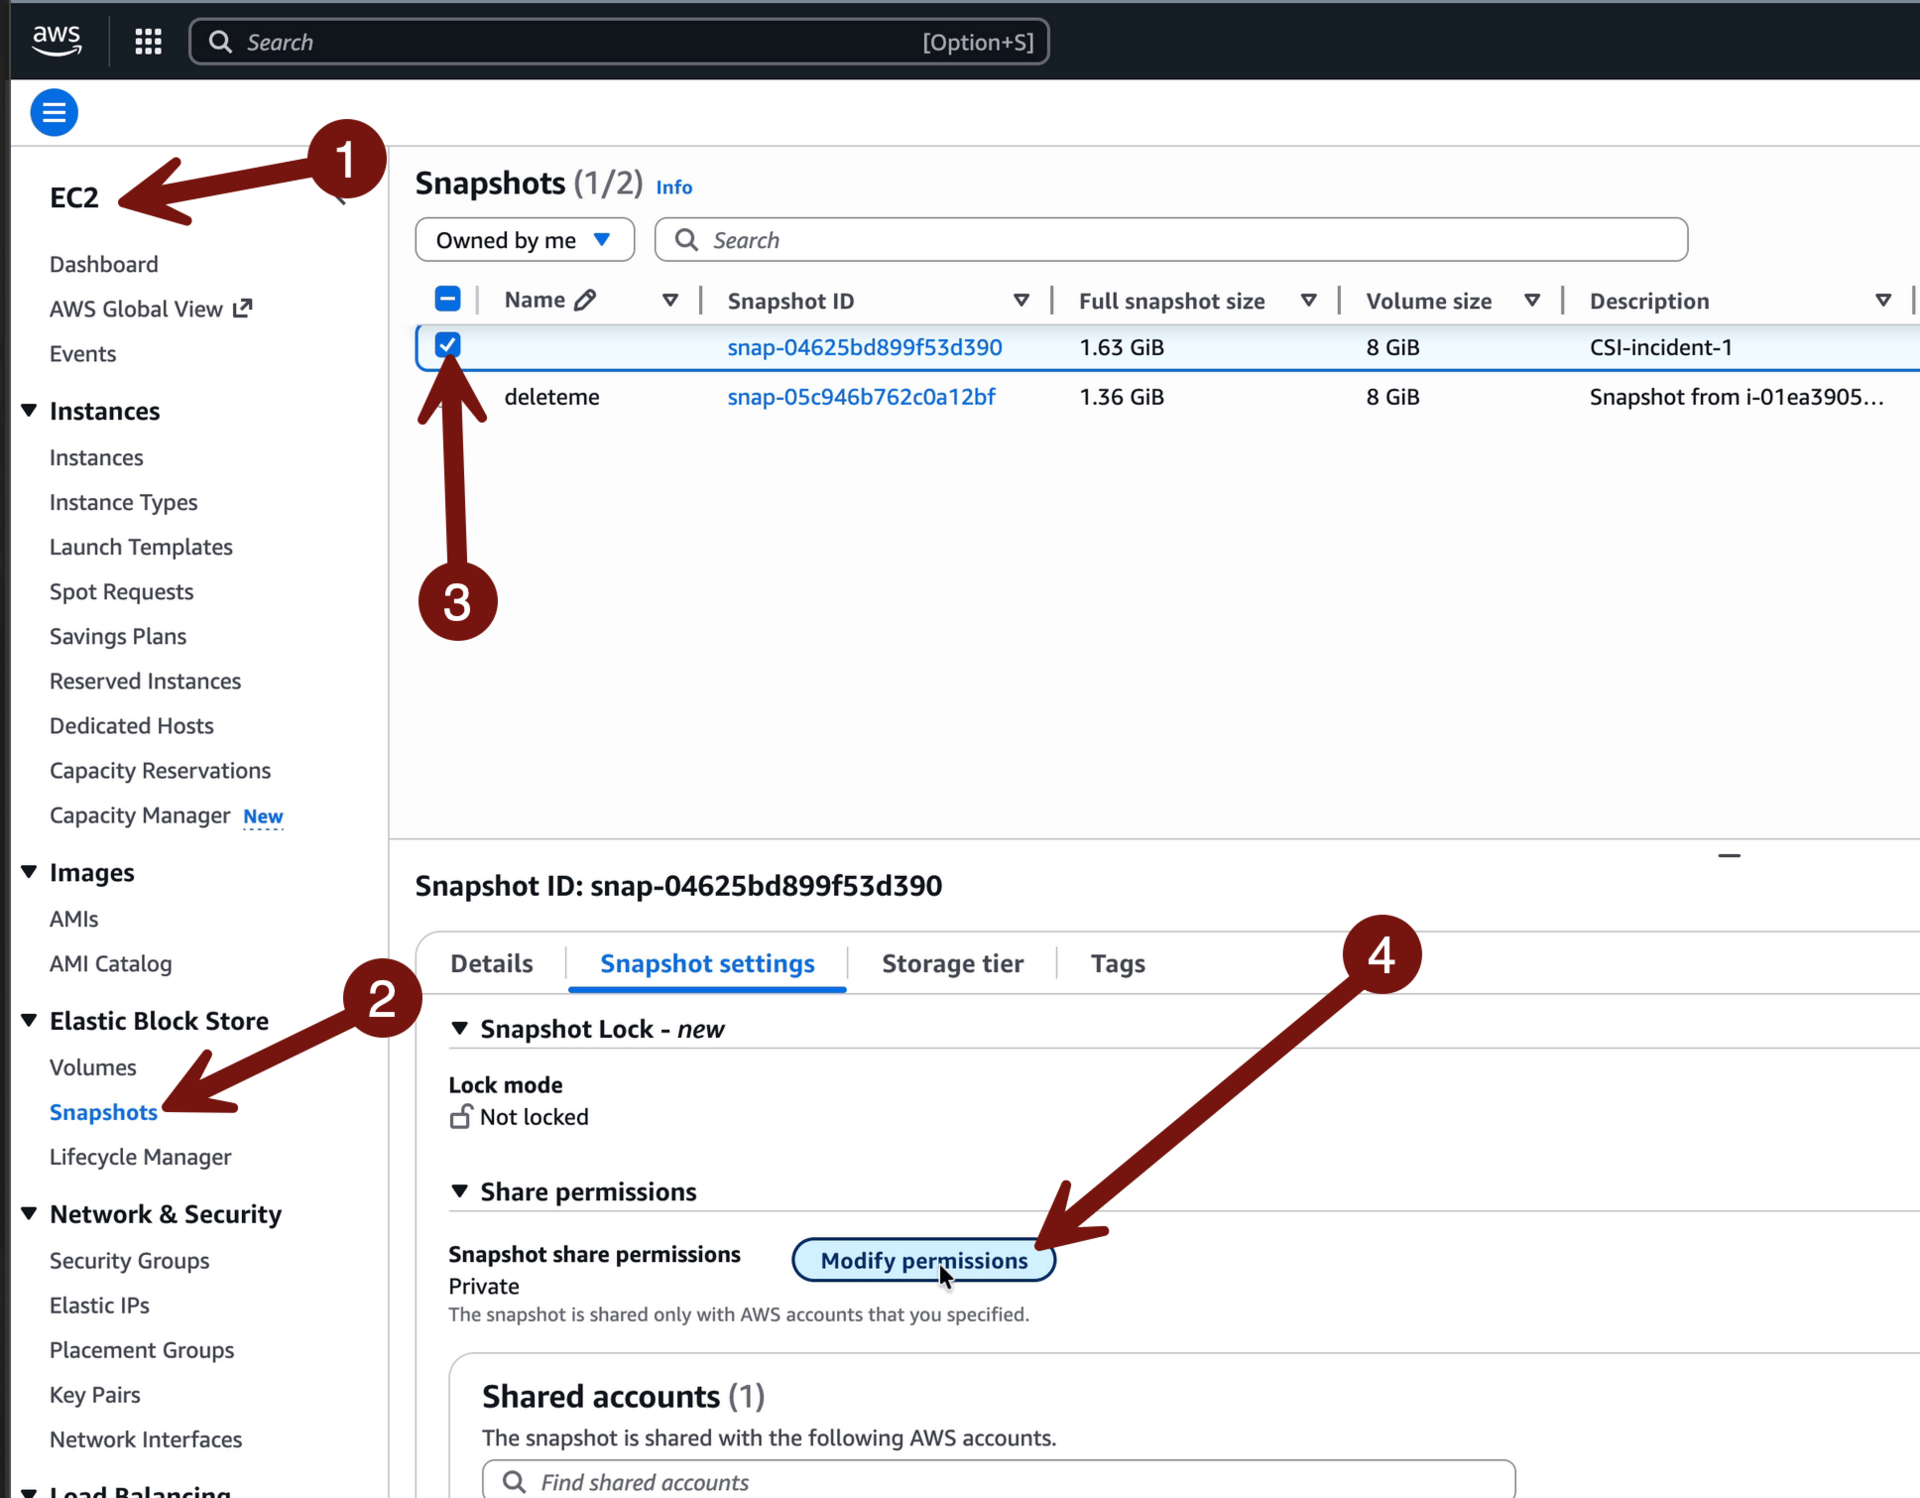
Then check Public > Modify permissions:

WHY DID YOU HIT YOURSELF IN THE FACE???
Okay, with that exposure in place, you probably received an alert (maybe 2, depending on Security Hub). Let’s go back into Cloud Defense > Posture Monitoring >Findings to start investigation. (Or click the link in the email notification).
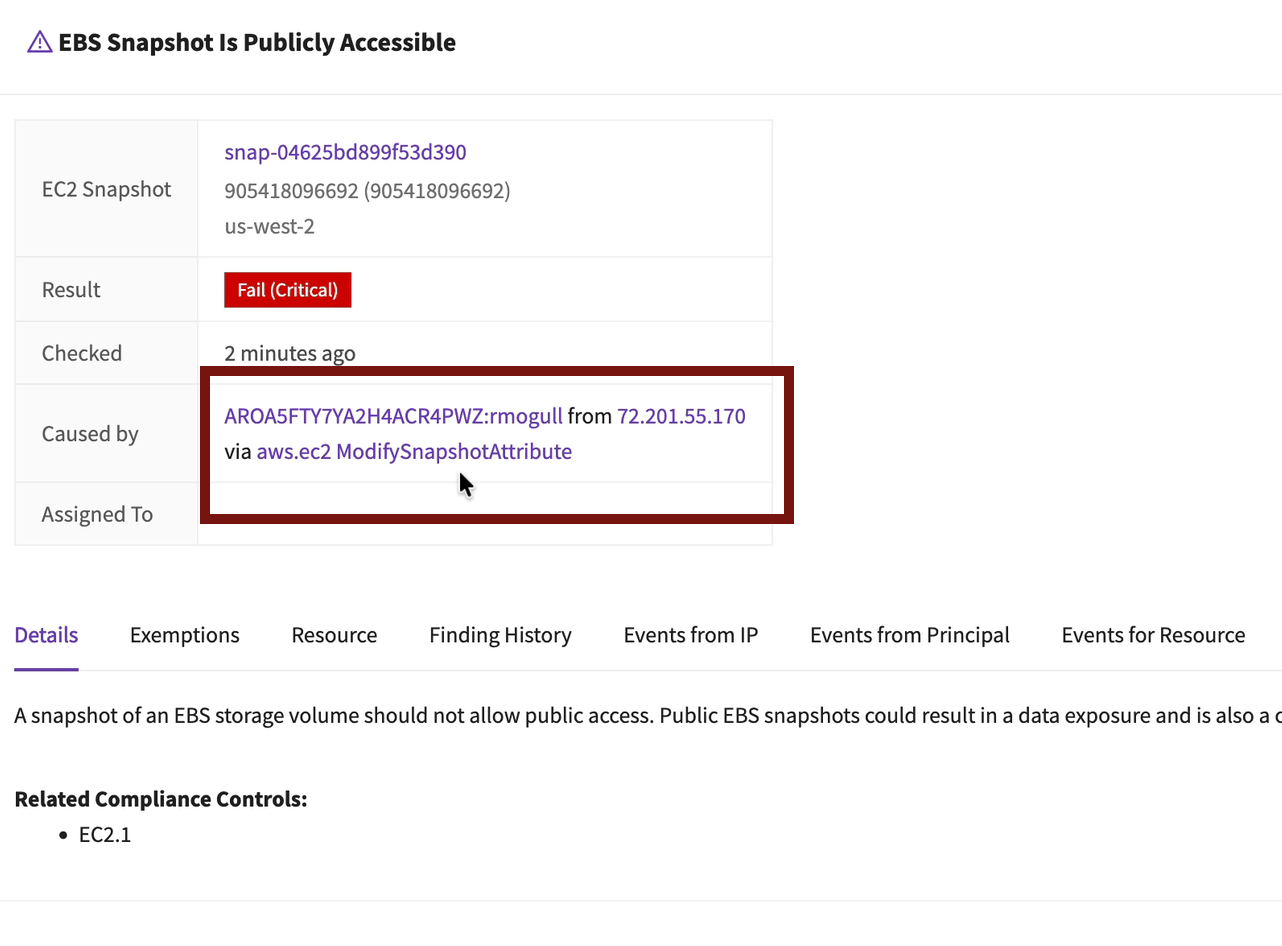
You’ll see the EBS snapshot finding right at the top. Click it:

A lot of the information you want is right on this first page. When it happened, who caused it, their IP address, and the API call that caused the misconfiguration.
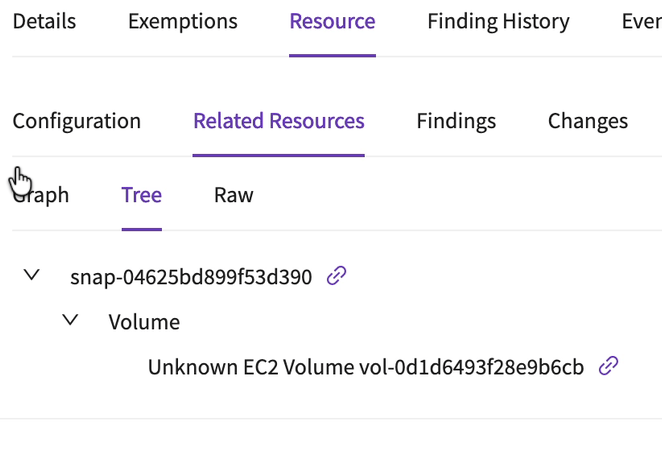
With the tabs on this screen you can investigate most of the incident using my RECIPE PICKS mnemonic for incident response. In my case I hit a wall when I looked at the related resources — it identified the volume the snapshot came from, but I deleted that volume a long time ago.
Go ahead and click around — you can see all the consolidated API calls referring to that resource and all the calls from the IAM role which triggered the event, and review the configurations of all the items in inventory.
This example was very simple. A single API call created a clear misconfiguration. But there are many other attacks which are more complex and involve multiple API calls. The advantage of using your CSPM for threat detection is it can alert on the misconfigurations which correlate best with attacker activity. It’s more an Indicator of Compromise than an Indicator of Attack. What’s the difference? An IoC is a sign the attacker is already in and did something bad. An IoA will fire off during an attack, including (sometimes) attacks which were stopped.
To clean out Cloud Defense
You can keep it for at least 60 days. Even if it goes past 60 days, you won’t be charged. To remove it from your organization just go into your organization management account and delete the stack (not the StackSet — deleting the stack will take care of that).
-Rich
Reply